Showing posts with label Crafts. Show all posts

Wednesday, October 16, 2013

Martha Stewart I am not, but I can sew a Fitted Crib Sheet


I am not an advanced sewer by any means. In all honesty I am probably only a beginner but I can make simple curtains, an apron or two, and childrens bedding. A few years ago as a way to cut our expenses I learned how to make fitted crib sheets.  I found that it cost me less than $3.00 to make as opposed to the crib sheets you find in the stores. Before I started making them I was buying the no name brands which still cost around $9.00 a sheet. Our girls are now 4 and still using their crib mattresses in their bunk beds. So over the course of four years I have saved quite a bit of money on sheets.  As our kids have gotten older I now make them matching flat sheets which only cost me $2.50 to make. So a full set of sheets is $5.50. Not bad, right? Of course if you do not purchase the supplies on sale you will be spending quite a bit more.

Not only do I save money, but my girls really enjoy going to JoAnns with mommy and choosing their own fabric.  I am always at JoAnns on Black Friday, which is when I get the best deals. Don't get me started on Black Friday, that is another post for another day. I prefer to make my kids sheets out of flannel, but that is just a personal thing. I can purchase flannel for under a dollar a yard (on Black Friday) and it takes two yards to make either sheet.

Here is a quick tutorial on how to make a fitted crib sheet.

Supplies Needed 
  • 2 yards of 44-45" wide fabric
  • 1 package of ¼" flat elastic
  • All purpose thread
  • See-through ruler
  •  Pins
  • Iron and ironing board
  • Scissors or rotary cutter and mat
  • Tape measure
  •  

     
    1 - Pre-wash and iron the fabric. This allows for any shrinkage before you start cutting the fabric to sew the crib sheet.

    2 - Cut a piece of fabric to measure 70 inches by 45 inches

    3 - Cut a 8-inch square from each corner of the fabric.

    4 - Fold the fabric over diagonally, with right sides facing each other, and pin the 8-inch  sides together to form the first corner of the crib sheet.
    • Sew a narrow seam. Reinforce the seam by sewing a second seam over the first one. Repeat the process until all 4 corners have been sewn
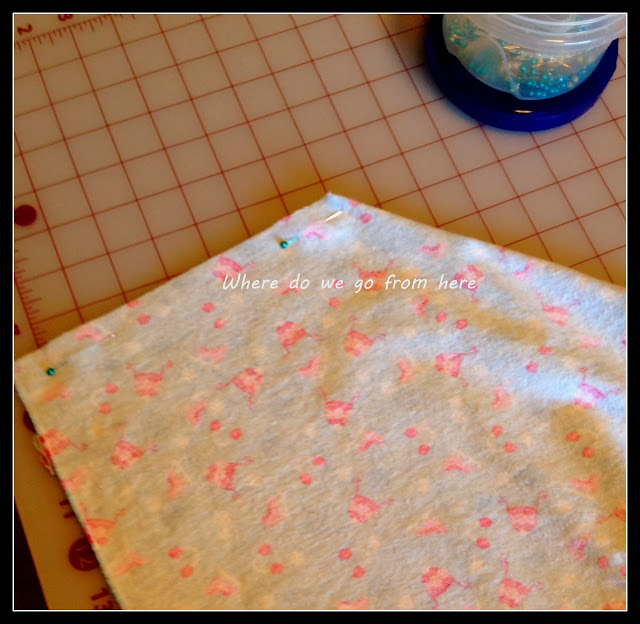
    5 - Fold and press under the edges all the way around the entire crib sheet. Sew the hem in place with a zig-zag stitch.

    6 - You will need 4 feet of elastic, cut into 4 1-foot lengths, (Either 3/8" or 1/4" elastic). Fold one piece of elastic in half. Sew it to the center of the first corner seam.
    • Use a zig-zag stitch to sew the elastic from the center of the corner, stretching the elastic while sewing the zig-zag seam. Sew the other half of the elastic in the same way.
    7 - Sew the elastic to the remaining 3 corners of the crib sheet.

    All done!!!
    Give it a try! What is the worst that can happen? You end up donating two yards of fabric to the local thrift store!

    Thursday, September 26, 2013

    Three Kids in One Room...


    I have no room to complain. We live in a 3,000 sq. ft. home, BUT the layout is not exactly kid friendly. So we have had all three kids in one bedroom. Last winter I came to my braking point. The chaos in their room nearly caused me to have a panic attack every time I walked in there. Their room consisted of 2 toddler beds, 1 crib, 1 play kitchen, 1 (6 cube) storage system, and bins of toys on the floor.  All of this in a room that barely fits a queen size bed and 2 night sands.

    We played around with the idea of loft beds from IKEA, but unfortunately the closest IKEA was not accessible to us because of a snowy mountain pass. So began my countless hours of searching Pinterest for a bedroom setup to accommodate multiple kids. Then I found it, now came the fun part. Convincing my husband that he wanted to build it. To my surprise I showed him the picture and his response was, "I love it, lets do it". Yahoo!

    So the construction began, first remove everything from their room. Our kids got to sleep on mattresses on the floor for a while, and they loved it. Then remove everything from their closet including their closet doors. Why remove the closet doors? Well their beds were going to be built inside the closet. Genius, right?!

    Here is LeiLei testing dads initial framing skills.


    Once dad had the upper bed braced, it was time to check out the top bed.


     Then the safety railings were added, as well as the headboards I made


    A privacy curtain makes it complete
     
     
    Yes, that dirty bed on the bottom is Ademans, he is a little too young for a curtain, so for now I still have to stare at his mess.
     
    Now that there is all of this space in their room, I could put another crib in their... Just sayin!


    Wednesday, September 18, 2013

    Burlap Fall Wreath

    Yesterday, I spent the morning taking one child to a doctors appointment for a possible broken nose. Thank goodness the nose is not broken, swollen but not broken. Then running a second child to a feeding therapy appointment.  By the time we got back home I had made the decision to spend nap time in my craft room. Should I have worked on my ever growing to do list? Probably... But mommy needed some craft therapy!

    I have been watching all these cute pins on Pinterest for burlap wreaths. I decided to make that my new addition for my fall decorating. I already had a grape vine style wreath, and a yard of burlap. So, I dug in.

    All of the posts I saw called for burlap ribbon, but I was not going to spend the money on it. Instead I cut 5, 4" "ribbons" from my burlap, (which probably equates to 75cents, (as opposed to a  $5.00 ribbon).  I did have a fall ribbon that I wanted to incorporate, knowing me I probably bought it last year when it was half off, and I had a handful of sunflowers that have been  repurposed many times.

    First I attached the burlap using florist wire.


    Then I added my flowers using my trusted hot glue gun.


    Last I added my trim ribbon, also attaching it using florist wire.


     The end result... A wreath I am quite happy with!


    Hope that inspires you to tackle a burlap wreath...